Replacing the Serpentine Belt
According to my owner's manual, the serpentine belt (what we used to call the "fan belt") is supposed to last for 150,000 miles. Unfortunately, like tires, the belt can age out long before you hit that mileage. At about 60,000 miles, I decided to have mine replaced a local truck garage. I asked for the old belt to keep as a spare and stored it away. About 10,000 miles later, I began to hear some odd noises up front when the engine was idling before it warmed up. Like an idiot, I ignored them.
One day, it was time to leave the campground and the slide wouldn't come in. It had been cranky, often stalling at the steepest part, but eventually making it in. Earlier, I had cleaned up all the grounds and wire connections, but it didn't help. I installed the Fleetwood slide lift block kit, a fairly unpleasant job that didn't help at all.
This time, the slide wouldn't come in at all. Then, I noticed the battery light on the dash was on. I went out to look at the engine and noticed that the coolant in my overflow tank was boiling. I ran back inside and turned off the engine. I went outside and looked under the rig and could see half the serpentine belt hanging down to the ground. The rest was draped over the pulleys, but not moving.
I called Coach-Net for assistance. I was not happy with the service, but that's a topic for another post. (In fairness, I should mention that I also had a bad experience with Good Sam roadside assistance). It turned out that the spare belt I was carrying was wrong size (way too short). My guess is that the shop that "replaced" it thought that the belt looked fine, charged me but didn't change it out, and gave me someone else's old belt. A brand new pair of driving shoes was missing from the rig after I got it back from them so I should have been suspicious. Needless to say I won't be going back there.
For many belts providers, the part number of the serpentine belt tells you the length of the belt. For example, I recently bought an AC Delco 6K1080 belt to carry as a spare for my '06 Bounder (on a 2005 Workhorse chassis). The 1080 means that the belt is 108.0 inches long (the 6 means your pulleys have 6 grooves). I've also learned that if your belt needs replacing, you should also replace the belt tensioner. The tensioner has a spring that pushes its pulley against the belt to keep it tight. When the spring gets weak, the belt slips and wears rapidly.
The parts and replacement advice below is for the Workhorse 8.1 engine, specifically the 2005 W22 chassis, but much of it will be useful for replacing the serpentine belt on any RV.
The Parts
If I had carried a new belt and tensioner as spares, I would have saved myself a whole day of frustration waiting for the tech to arrive, watching him try to install the wrong size belt, and paying labor rates as he drove 85 miles carrying the wrong belt with him. I could have replaced the belt myself. I've since done this myself, though a second pair of hands would make it much less frustrating. When you're alone, putting the belt on one pulley tends to make it come off two others.
For my rig, the correct belt was the AC Delco 6K1080 from Amazon.com
I also needed a Gates 38258 belt tensioner. The tensioner is very easy to replace. It's held on by the single bolt you see in the picture. The only tool you need a 15 mm wrench (or socket) for the bolt. I found it easier to use the wrench. The back of the tensioner has protrusions that fit into depressions in the engine to keep the tensioner body from rotating. Make sure it's flush with the engine before tightening the bolt. I tried to replace mine without removing the belt, but was unsuccessful, so be prepared to reinstall the belt when doing the tensioner.
Here's a more general reference for the various parts and tools you can use:
This tool is not necessary to replace the belt, but it's sure nice to have, especially if you have large hands and/or short arms: OTC (7654A) Serpentine Belt Installation Tool. It's especially useful for pulling the belt down under the idler pulley at the top of the diagram below. I've never tried it, but it's possible that your RV awning wand would work for this.
Serpentine Belt
The following Part numbers are for the Workhorse W series chassis with the 8.1 engine. All are 108". The P32 Chassis uses a 103" belt. If any of the links don't work, search Amazon for the supplier and part number after clicking on the link.
| Supplier | Part No. |
|---|---|
| Workhorse | W0000581 |
| AC Delco | 6K1080 |
| Gates | K061080 |
| NAPA | 25-061080 |
| Goodyear | 4061080 |
| Kelly Springfield | 1080K6 |
| Dayco | 5061080 |
Serpentine Belt Tensioner
| Supplier | Part No. |
|---|---|
| Workhorse | WH12581203 |
| AC Delco | 38258 |
| Gates | 38258 |
| NAPA | 38258 |
| Dayco | 89430 |
| GM | 12581203 |
Replacing the Serpentine Belt
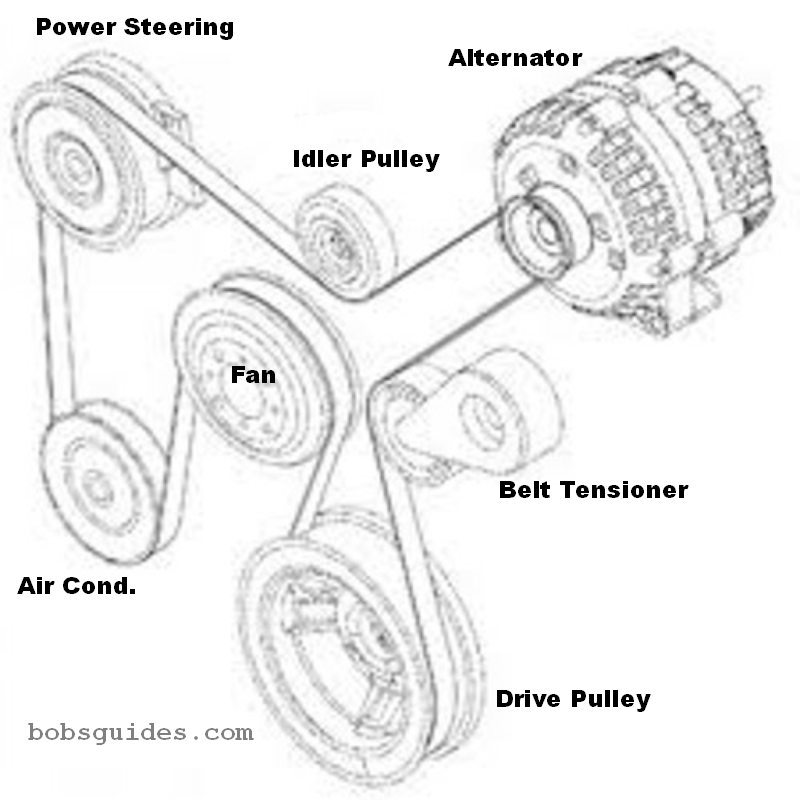
Workhorse W Chassis Serpentine Belt Routing Diagram
The web is full of diagrams showing the routing for the Workhorse W22 serpentine belt. Every single one of them I've found is backwards (including the one in the Workhorse Chassis Manual). They all show the alternator on the left, but as you'll be looking at the engine, it will be on the right. I've reversed this image and labelled the pulleys so they'll match what you'll be seeing when replacing the belt. I'm not positive about the pulley names, but they will match my description below for replacing the belt.
Replacement
In order to remove the old belt or install the new one, you need to swing the belt tensioner to relieve the pressure on the belt. You can use a 3/8 ratchet (with no socket) or a 3/8" breaker bar. There are also professional, dedicated belt-tensioner wrenches, but they're expensive and unnecessary unless you'll be changing belt on a daily basis.
The tool fits in the square hole in the center of the tensioner's black pulley. Make sure it's all the way in. If it's all the way in so it won't move or pop out once you put tension on it. Here's a picture of a ratchet in place:

If your tensioner spring is weak, you may be able to skip the ratchet and just pull down on the black pulley with your hand in order to remove an old belt. If this works, you definitely need a new tensioner. Without it, your new belt won't last very long.
With the ratchet inserted, you need to set the cam on the ratchet so you can move it all the way the left, then flip the cam and lower the black tensioner pulley by moving the ratchet handle to the right. I used a piece of 22" iron pipe I had laying around. I slipped it over the ratchet, moved it to the right, then trapped the end of the pipe behind the right-hand leaf spring as shown below.
I don't really recommend this method because I think if the pipe had slipped off the leaf spring, it would have broken my jaw. It would be better to have a trusted friend hold it in place or use a bungee, wire, or zip tie to secure it in place.


In the picture on the right above, you can see the ratchet at the left with the end of the pipe slipped over it, and on the far right, the other end of the pipe stuck behind the leaf spring.
Once the tensioner is moved to the side, and the old belt is off, it's time to put in the new one. This can be frustrating, especially if you're doing it alone, but one person can definitely do it — it will just take a little longer.
Mental Practice
The first thing to do is to slide under the rig from the front until you can see the belt and pulleys. Your feet will be sticking out the front of the rig. If you have a hard surface, a creeper is nice because it will also raise you up a little, making it easier to reach the top pulleys. Nothing useful can be done from above on my rig in this process.
If you're not on a hard surface cardboard or a blanket will make you more comfortable. I bought a sheet of plastic called a "Cheaper Creeper" a long time ago, but can't find it for sale anywhere.
Next, familiarize yourself with the pulleys. Find the black tensioner pulley on the right side. It's smooth with no grooves at all. On the far top right, hidden by the tensioner and by the lower radiator hose is the alternator pulley (it has grooves). It's the smallest grooved pulley. You can see part of it if you move off to the right and look past the tensioner.
The three center pulleys, going from bottom to top, are the drive, fan, and idler pulleys. From below, they appear to be in a straight, vertical line. The idler pulley is almost impossible to see.
On the left, you'll see the AC pulley on the bottom and the power steering pulley above it.
One key to remember is that across the top, the belt goes outside (over) the alternator and power steering pulleys, but *under* the idler pulley (see the diagram).
Here's how I think of how the belt runs. The bottom end goes around the drive pulley. Then, the whole belt gets pushed up past the tensioner. One loop goes to the right, around the alternator. Another loop goes to the left under the idler and around the power steering and AC pulleys.
Here are a couple of views from below:
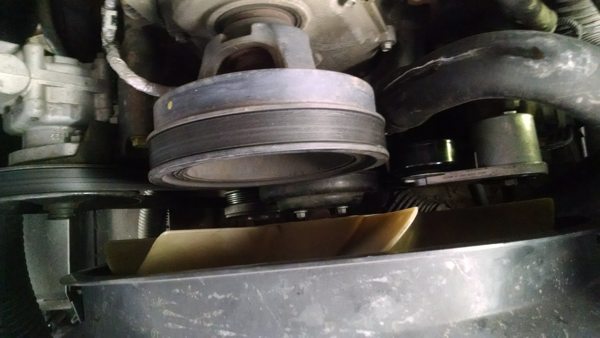
In the photo above, you can see the drive pulley at the bottom center with the fan pulley above it and the idler pulley peeking out on the left from behind the fan pulley. On the right, you can see the belt tensioner pressing on the belt. Notice that the belt goes to the left of the black tensioner pulley.
On the left side of the photo, you can see the AC pulley at the bottom. The power steering pulley is hidden behind it.

The photo above is almost the same, but the camera has been moved out and to the left so you can see the power steering pulley above the AC pulley. You can see the drive pulley and the fan pulley on the right and at the lower right of the picture, you can see the silver belt tensioner.
Actual Install (alone)
I'd recommend saving the idler pulley until near the end. You can't see it, it's difficult to reach, and it's going to come off repeatedly as you work on other pulleys. None of this will work if the belt tensioner is not moved out of the way. Here's how I install the belt:
- Push the whole belt up through the gap next to the tensioner pulley, leaving a loop hanging down to go around the drive pulley.
- With your right hand reach up to the right of the tensioner and wrap the right side of the belt around the alternator pulley.
- Bring your right hand back down and reach up past the tensioner. Push the belt to the left past the idler pulley far enough that you'll be able to reach it from the left side.
- Slide over to the left side and reach up with your left hand. Pull the belt over and wrap it around the power steering and AC pulleys.
- Recheck the wrap on the alternator and power steering pulleys. Make sure the belt is centered on each one.
- Put the lower loop around the drive pulley if you haven't already.
- Wrap the belt around the AC pulley at the bottom left.
- With your left hand, reach up and feel for the idler pulley at the top center. Pull the belt down so it goes under the idler pulley. You may have to take it off the AC pulley to make that work.
- Recheck the belt position on all the pulleys. It should be fairly tight, even with the tensioner out of play. If it's not, the odds are that the belt is not below the idler pulley or is off of at least one pulley.
- Once the belt is in place, release the belt tensioner slowly. Then recheck all the pulleys. There should be no slack in the belt anywhere.
- Double check the position on all pulleys, then start the engine.
- Observe the belt immediately (you can see it past the drivers-side wheel). If it's off or not moving, stop the engine as fast as you can.
With an Accomplice
You're welcome to devise your own strategy, but here's how I do it with a helper. The steps are the same except that I have the helper manage the tensioner with the left hand while holding the belt on the alternator pulley with the right hand.
Wrapping Up
It's a good idea to inspect your belt periodically for wear and cracks. I'd also recommend listening to the belt from outside the rig right after your start it. Do it right after installing a new belt to see what normal sounds like. Then make a point of listening again from the outside the front of the rig right after starting it for anything that doesn't sound normal. Any squeaks, whines, or ticking noises could indicate that it's time for a new serpentine belt.
Please let me know through the contact page if you spot any errors or have suggestions on improving this page.
Full disclosure: If you buy some of the products listed on this page using the links here, you will be helping to support this site. As an Amazon Associate I earn from qualifying purchases/
Thank you for visiting BobsGuides.com
— Bob Ray


